
Introduction: Busting a Smart Home Myth
In the world of smart homes, some rules seem to be set in stone. One such rule stated that without a neutral wire at the switch, you absolutely had to choose between a smart switch and a smart bulb, but never both simultaneously. This technical constraint severely limited our automation possibilities for a long time, forcing us into unsatisfactory compromises.
The problem, however, is simple to understand: on a circuit without a neutral wire, the smart switch needs to draw a minimum current through the bulb to maintain its network connection. When the smart bulb is off or set to a low brightness, it no longer allows enough current to pass through. The result: the switch disconnects and becomes unusable, creating a particularly frustrating situation.
After exploring the NodOn solution in a previous article, today we're going to uncover three additional techniques that definitively solve this puzzle. These tested and approved approaches will give you the flexibility you need to modernize your electrical setup without compromise.
First Solution: The Shelly Module with Built-in Bypass
A Deliberate Technological Choice
For this first approach, we're using the 3rd generation Shelly 1L. This choice might seem surprising, especially since I usually recommend avoiding Wi-Fi in smart homes in favor of Zigbee, Thread, or Z-Wave. However, this module offers a decisive advantage: it comes with a component called a "bypass" that completely changes the game.
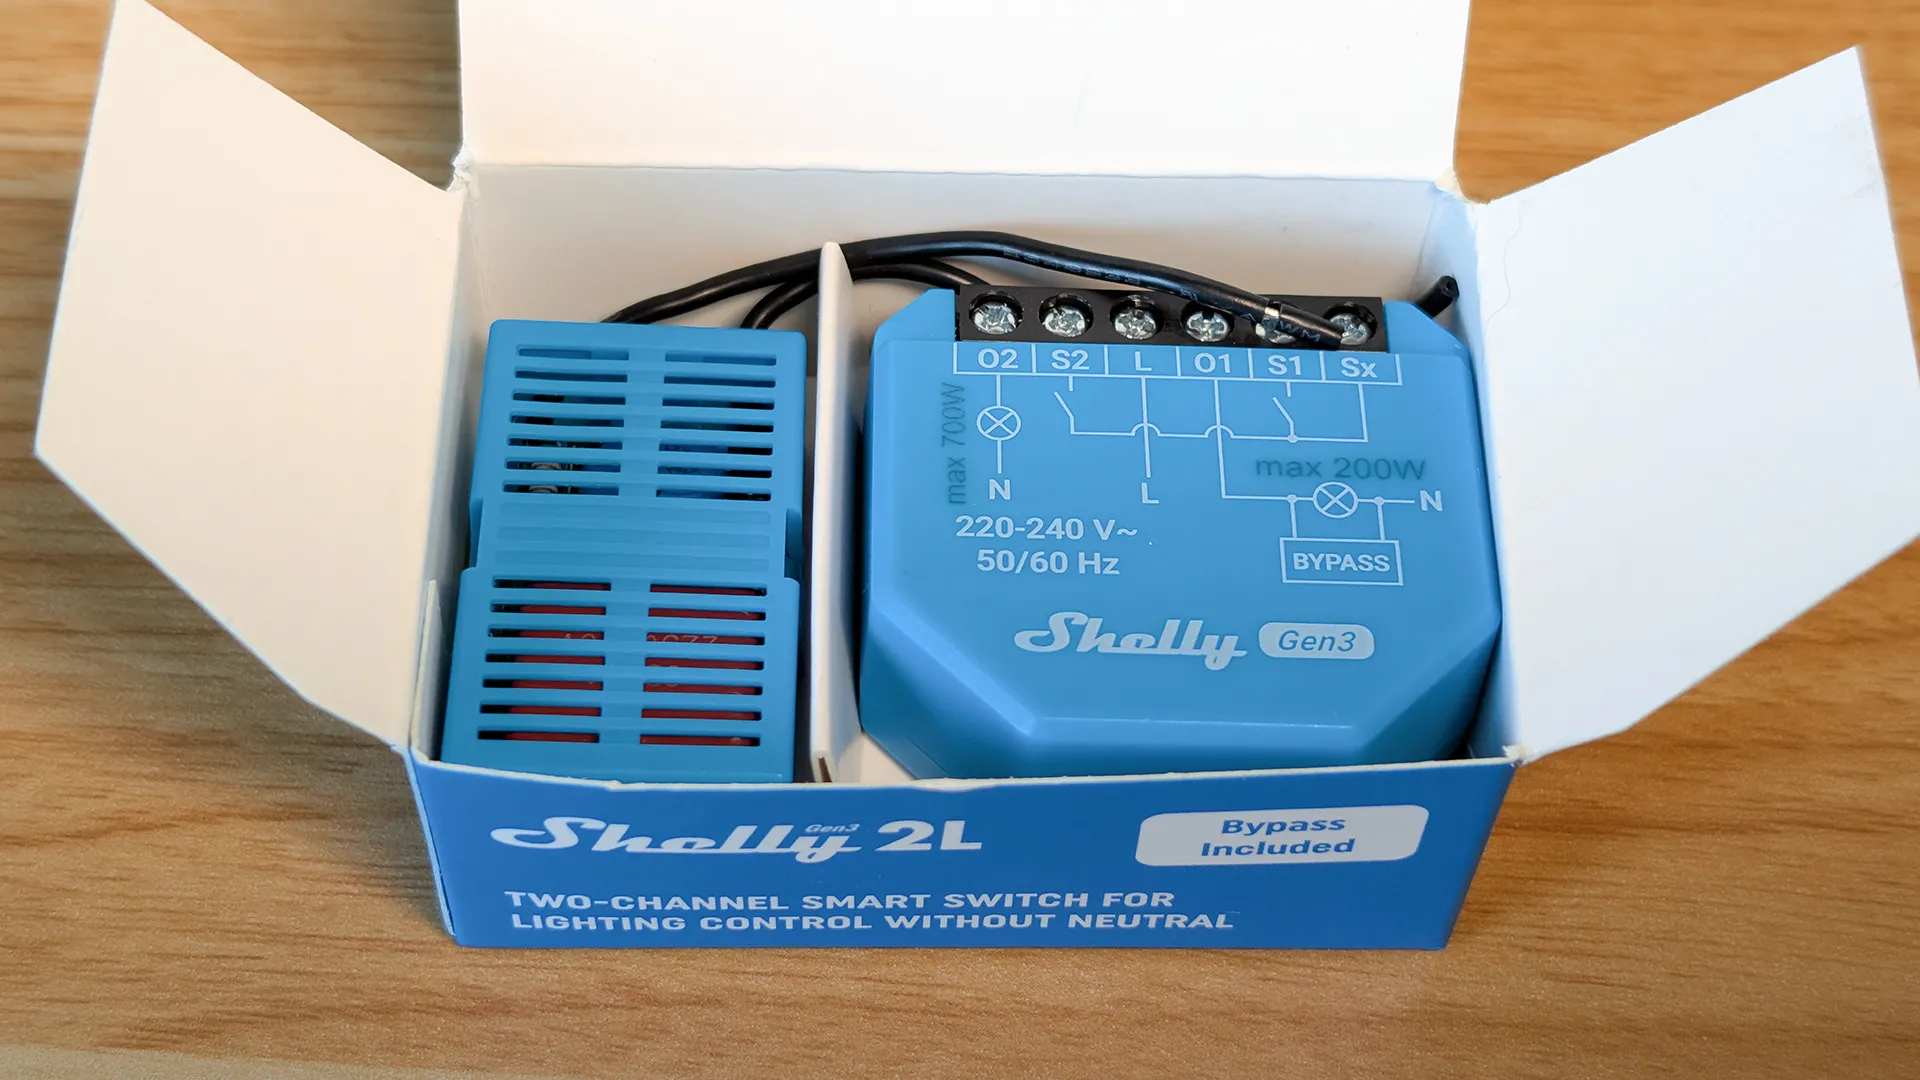
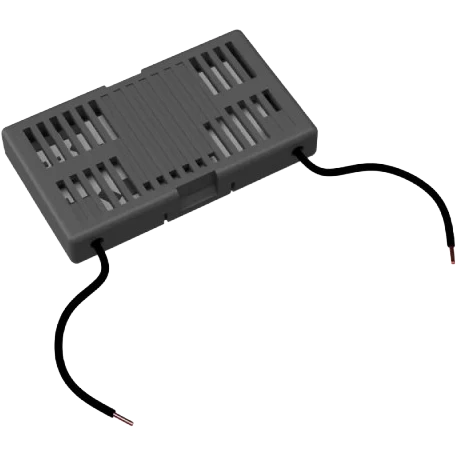
The bypass acts as a permanent electrical shunt. Its role is to maintain a constant minimal current flow, even when the smart bulb is completely off. This continuous flow ensures that the switch module remains constantly powered and operational. It's an elegant solution that solves the problem at its source.
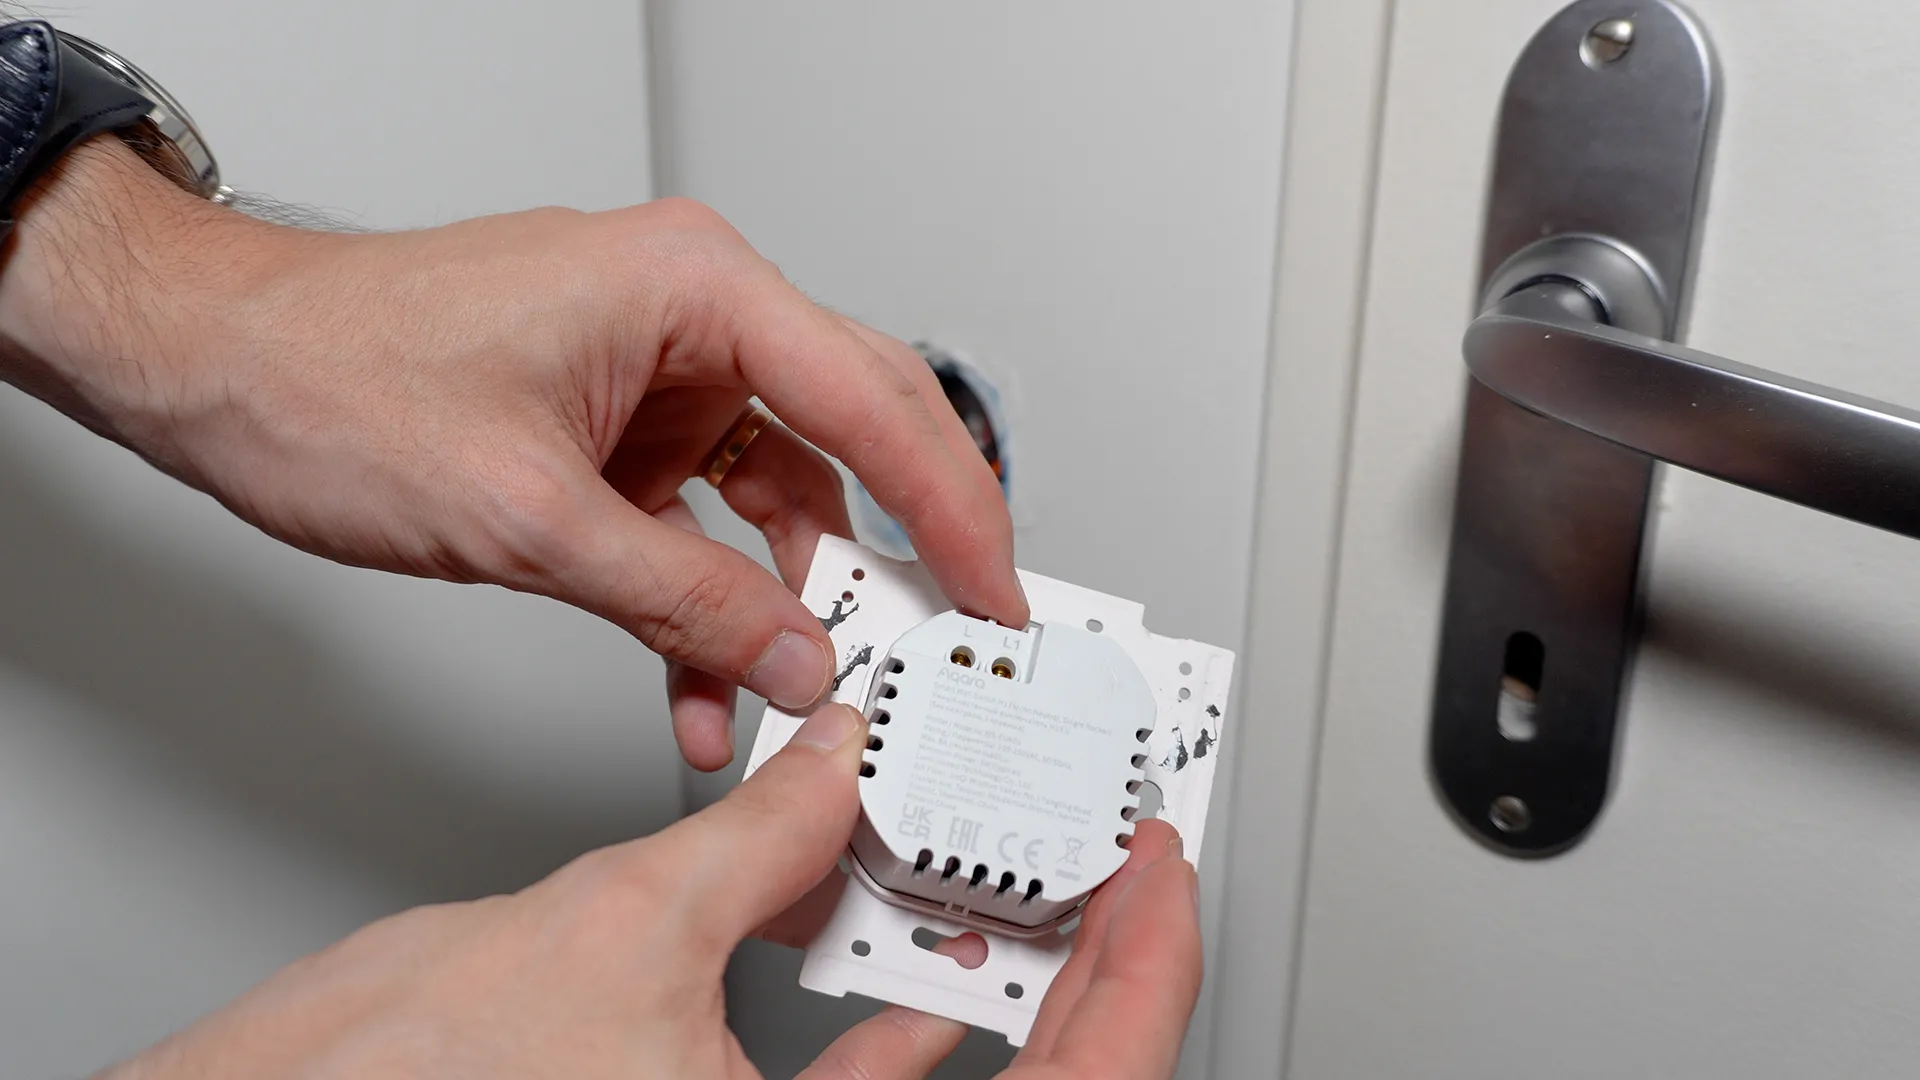
Installing the Module in the Switch
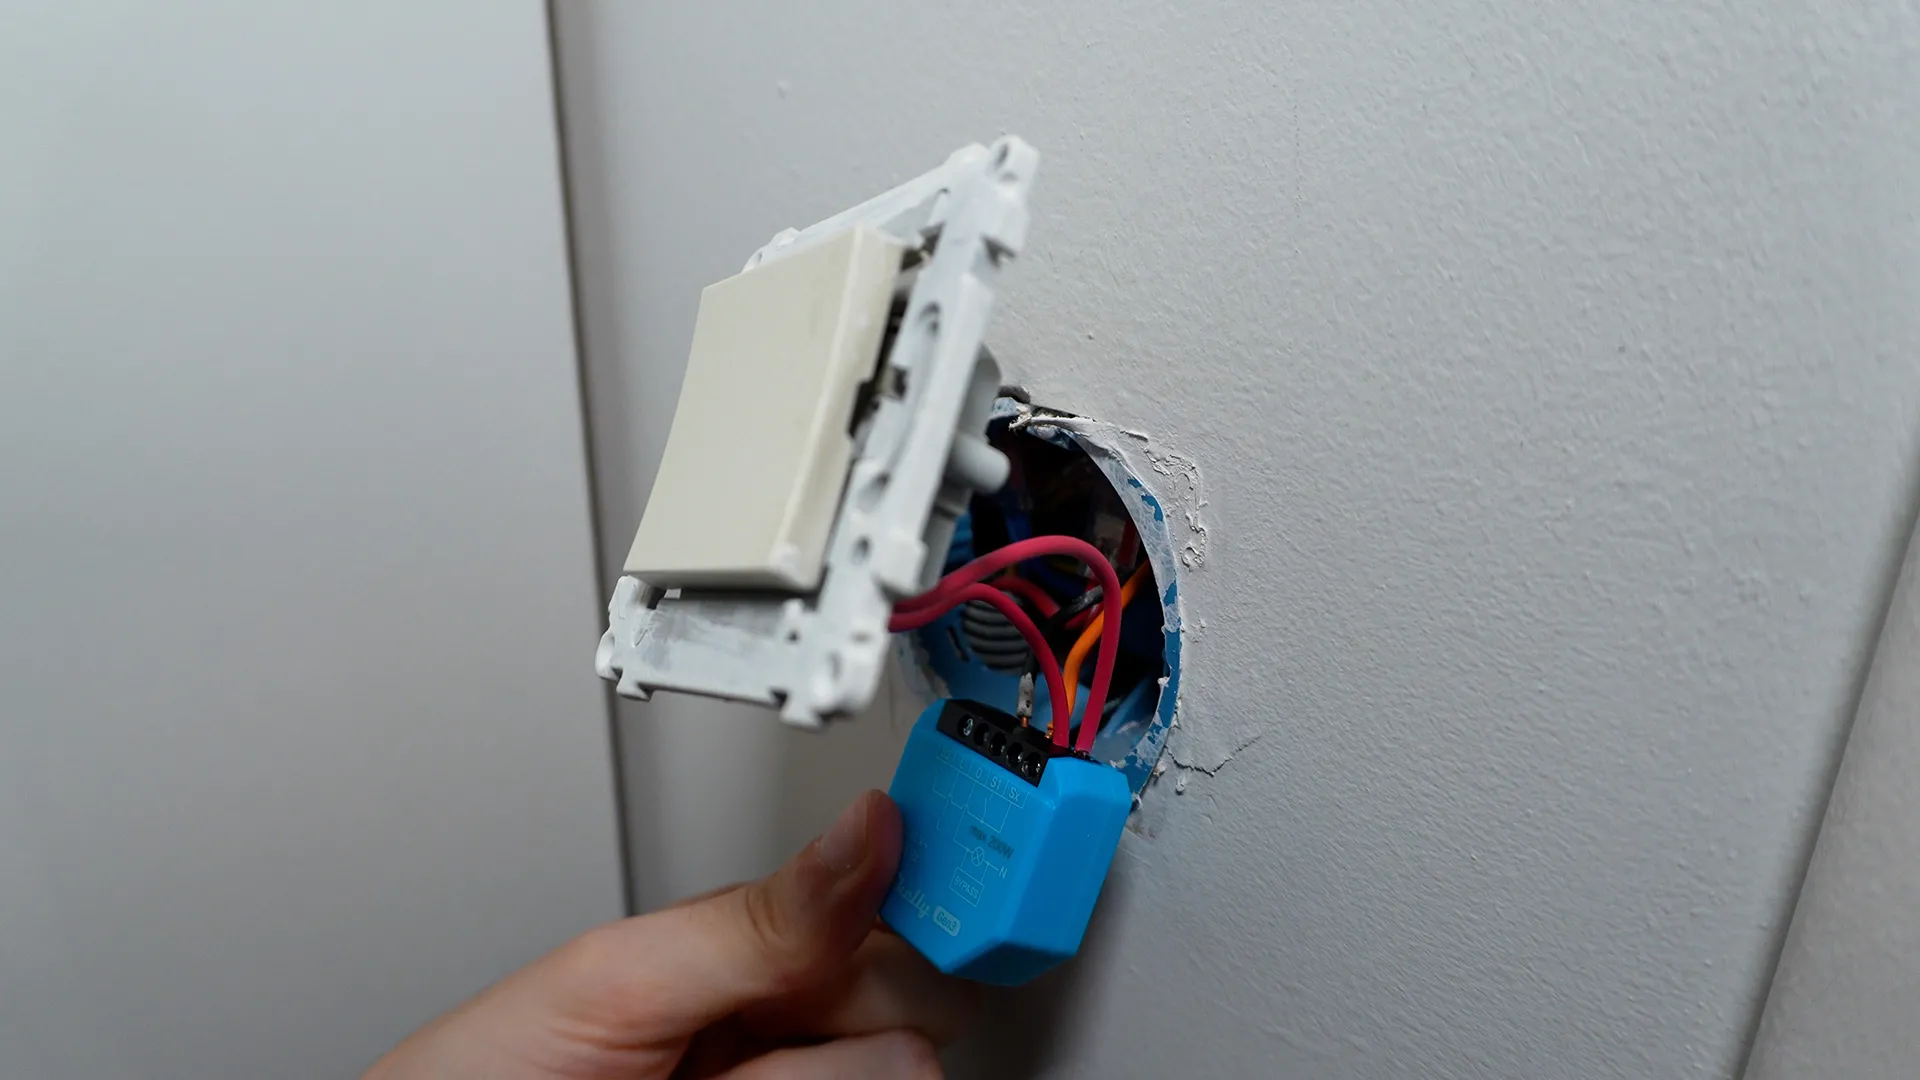
Installation begins by disassembling your existing conventional switch. You'll find two main wires: the live wire, which typically connects to terminal L, and the switched live (or load) wire, connected to terminal 1. Once these wires are identified, wiring the Shelly module proceeds methodically.
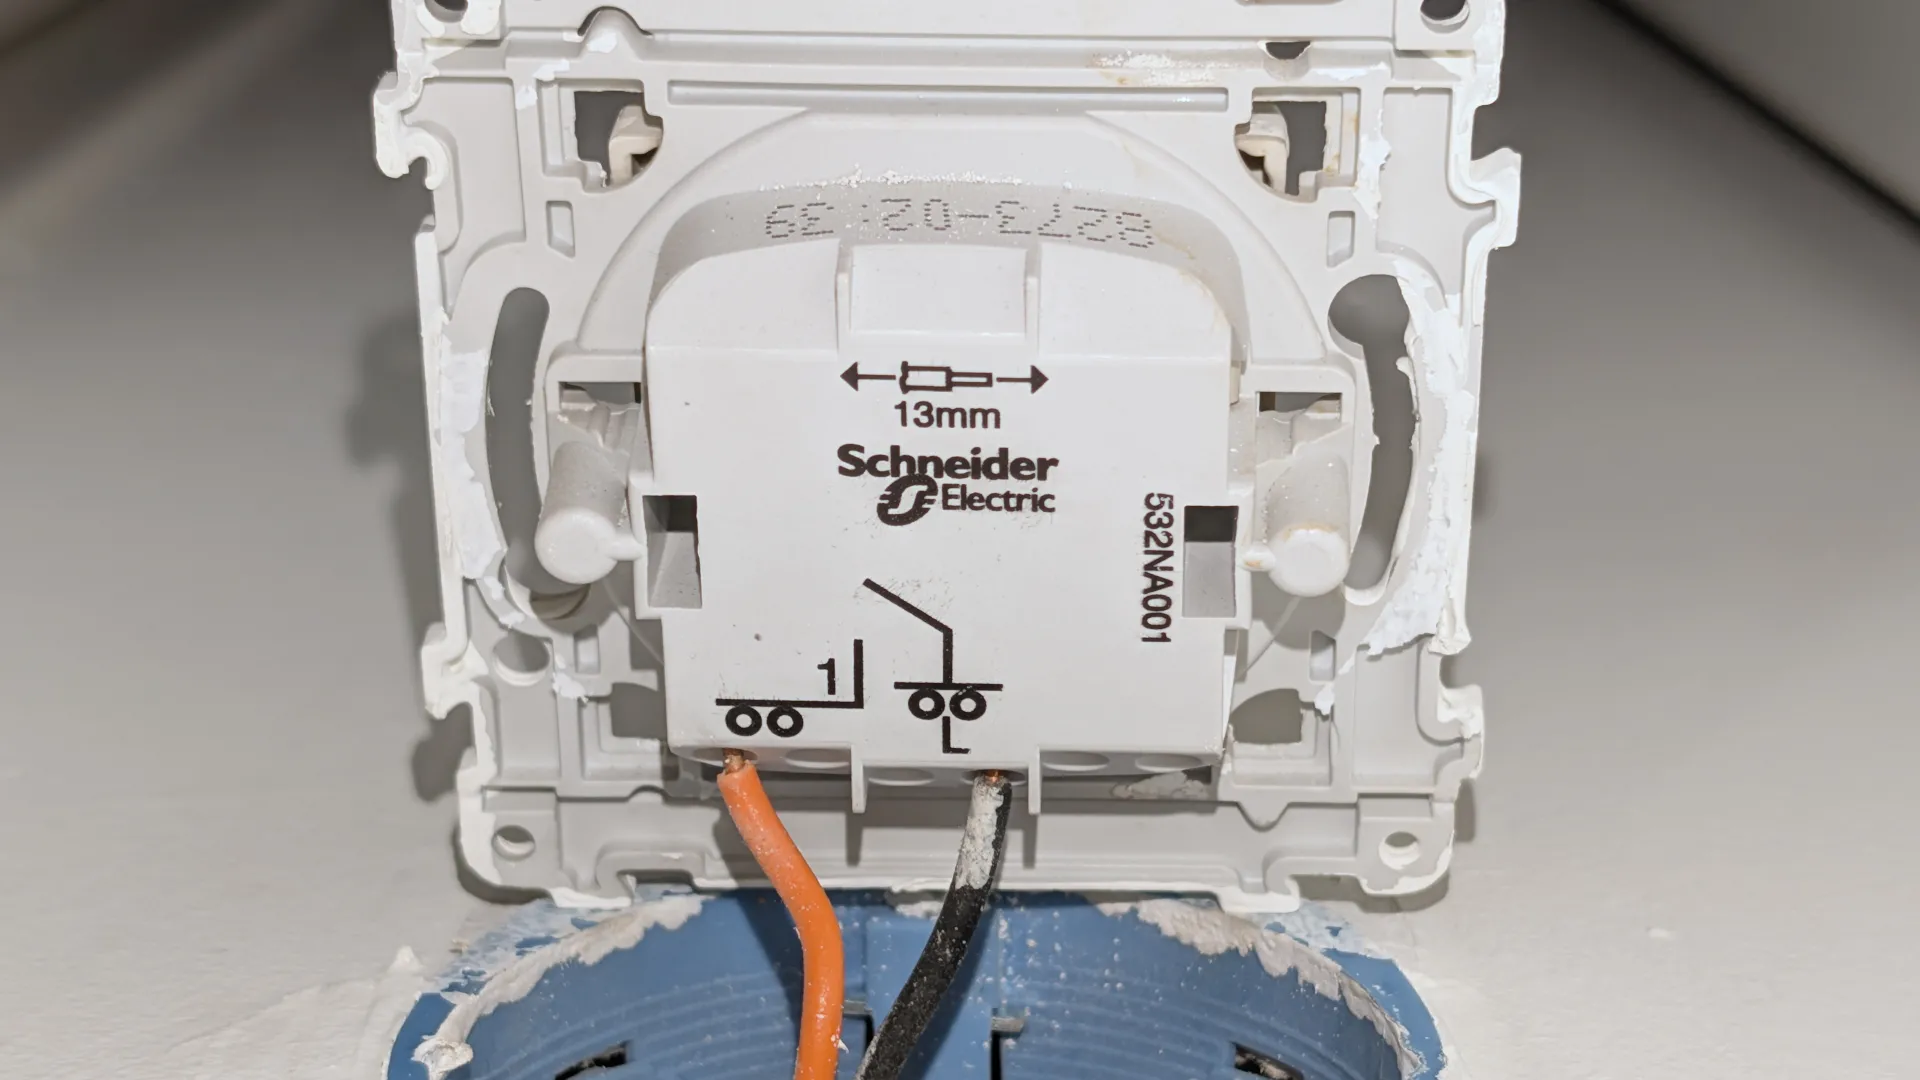
The live wire connects to the module's L input, while the switched live (or load) wire connects to terminal O. To allow your physical switch to communicate with the module, two additional wires connect the Shelly's S1 and Sx terminals to the switch terminals. This setup transforms your conventional switch into a smart controller capable of operating the smart bulb while retaining its traditional manual functionality.
Bypass Configuration at the Ceiling Fixture
The real magic happens at the ceiling fixture. By removing the cover, you'll access three essential wires: the earth (ground) wire, the switched live (or load) wire, and that crucial neutral wire which, contrary to popular belief, is indeed present at the light fixture. It's precisely this presence of the neutral wire at the ceiling fixture that makes the bypass installation possible.

Installing the bypass requires two three-input Wago connectors to create a clean and secure parallel setup. The first Wago connects the neutral wire from the ceiling, one end of the bypass, and the wire that will connect to the neutral of the lamp holder. The second Wago connects the switched live (or load) wire, the other end of the bypass, and the wire that will power the live side of the lamp holder. This configuration creates the permanent electrical path the module needs to remain functional.

Integration with Home Assistant
Once the physical installation is complete, the software configuration remains remarkably simple. The Shelly app allows you to add the module to your home's Wi-Fi network. Home Assistant, thanks to its auto-discovery feature, immediately detects the new device. Integration is done in just a few clicks, giving you instant access to full control of the relay.
The ultimate test is to turn on the module and set the smart bulb to its minimum brightness. After several minutes in this configuration, the Shelly module remains perfectly operational and accessible. Without the bypass, it would have disconnected in a few seconds, thus proving the effectiveness of this solution.
Second Solution: Zigbee Smart Switch with External Bypass
The Smart Decoupling Concept
This second approach takes the concept even further by using a true Zigbee smart switch combined with the same Shelly bypass. The trick lies in configuring the switch in "decoupled" mode. In this mode, the switch never physically cuts power to the bulb. It becomes a sophisticated remote control that sends its commands to Home Assistant, which then takes charge of controlling the smart bulb.
This setup offers ultimate flexibility: you retain the look and feel of a traditional switch while gaining all the possibilities offered by smart home technology. Automations become infinitely richer, allowing you, for example, to create complex scenarios based on the time of day, ambient light, or even your presence in the room.
Practical Setup
The physical installation proves even simpler than the first solution. The Zigbee smart switch, like Aqara models which are particularly well-suited for this configuration, only requires two connections: the live wire and the switched live. The bypass will be installed in exactly the same way at the ceiling fixture as with the first solution. It will play the same crucial role: maintaining the minimum current required.
Pairing with your Zigbee coordinator is usually done by holding the switch button for five seconds. Once detected by Zigbee2MQTT or ZHA, the switch appears in Home Assistant where you can configure its behavior. Decoupled mode is activated in the device settings, transforming each press into an event you can leverage in your automations.
Advantages of this Configuration
For me, this solution strikes the perfect balance between functionality and elegance. The switch retains its usual location and classic functions, which is reassuring for less tech-savvy family members. Simultaneously, you gain full control over the smart bulb, allowing you to adjust its color, temperature, brightness, or even create complex animations.
The Zigbee protocol also brings its own advantages: reduced energy consumption, a self-healing mesh network, and no cluttering of your home Wi-Fi network. Furthermore, as a mains-powered device, these types of switches act as routers, thereby strengthening your Zigbee network.
Third Solution: The Wireless Battery-Powered Switch
Simplicity First
Sometimes, the simplest solution is still the best. If you want to avoid any modifications to your electrical installation at the ceiling fixture, or if your setup has specific constraints like a complex two-way switch, the wireless battery-powered switch offers an elegant alternative.
This approach involves completely neutralizing the existing wall switch by directly connecting the live wire to the switched live via a Wago connector hidden behind the switch. The smart bulb thus remains permanently powered. A wireless switch, fixed over the old one or nearby, takes over for manual control.
Managing Complex Two-Way Setups
Two-way switch installations often pose a particular challenge in home automation. Depending on your initial wiring configuration, modernization can become complex and require pulling new cables. The wireless switch elegantly bypasses this issue by completely freeing itself from existing wiring.
Models like those offered by Aqara provide several years of battery life with a simple coin cell battery. Their sleek design integrates harmoniously into your interior, and their installation requires no electrical skills. You can even multiply control points by adding multiple wireless switches in different strategic locations in the room.
Configuring Automations
In Home Assistant, each press of the wireless switch generates an event that you can capture in your automations. This event-driven approach offers complete freedom in defining behaviors. A single press can turn lights on or off, a double press can activate a specific scenario, and a long press can trigger a gradual change in intensity.
Creating automations for these switches remains accessible even to beginners. Home Assistant's visual interface allows you to build complex scenarios without writing a single line of code. You can thus adapt the behavior of your lighting according to your specific needs, creating a truly personalized experience.
Essential Safety Considerations
Crucial Electrical Precautions
Before undertaking any modifications to your electrical installation, certain precautions are essential. Safety must always take precedence over functionality. Always cut the power at the main circuit breaker before any intervention. Use a voltage tester to confirm the absence of current before handling wires.
A crucial, often overlooked point concerns bulb replacement. With these configurations where the bulb remains constantly under power even when turned off via home automation, you must absolutely cut the circuit breaker before changing any bulb. This precaution prevents any risk of electrocution, which is particularly important if the bulb breaks during removal.
Compliance with Standards and Regulations
Any modification to your electrical installation must comply with current standards, particularly NF C 15-100 in France. If you are unsure of your skills, do not hesitate to call a professional electrician. The cost of a professional intervention is negligible compared to the risks involved with a poorly executed installation.
Make sure to document your modifications for easier future maintenance. A simple diagram showing the location of modules and bypasses can be invaluable during troubleshooting or when upgrading your system. This documentation will also be useful if you sell your home, allowing new owners to understand and maintain the system.
Comparing the Three Solutions
Selection Criteria
Each solution offers specific advantages depending on your situation. The first solution, using the Shelly module, is perfect if you want to keep your current switch while adding smart capabilities. The cost remains moderate, and installation is relatively simple for anyone with basic electrical knowledge.
The second solution, featuring the Zigbee switch and bypass, is my primary recommendation. It offers the best balance of functionality, reliability, and integration into a modern smart home ecosystem.
The third solution, using a wireless switch, excels in its simplicity of implementation. With no modifications to the existing ceiling light wiring, it's particularly suitable for renters or situations where ceiling access is difficult. Battery power also eliminates any concerns related to powering the module.
Conclusion: The Impossible Duo Made Real
We've just demonstrated that a smart switch and a smart bulb can coexist on a no-neutral circuit – it's no longer a technical impossibility. These three tested and approved solutions each offer a tailored response to specific needs and constraints. The myth is definitively busted, paving the way for more flexible and comprehensive smart home installations.
My preference clearly goes to the solution combining a Zigbee switch with the Shelly bypass. This approach offers the best compromise between performance, reliability, and scalability. It integrates perfectly into a modern Home Assistant ecosystem while retaining the familiar look and feel of a traditional switch.


De mon côté, j'ai pensé à une alternative, mais je ne suis pas sûr qu'elle fonctionne, avec des modules ZB Mini L2:
- Alimenter le 1er module avec le câble de phase, et le 2e en shuntant l'une des navettes avec le fil de phase,
- Relier les 2 sorties des modules (L2) en utilisant la 2e navette, et avec le fil d'alimentation d'origine de l'ampoule,
- Relier chacune des entrées S0/S1 de chaque module à l'interrupteur où il est installé. Créer une automatisation qui bascule la sortie de chaque module quand on agit sur un interrupteur, ou selon un ordre via Home Assistant
Bon, avec un schéma ce serait plus clair, mais comme a priori on ne peut pas poster d'image, n'hésitez pas à me contacter pour que je vous en envoie un.
Merci d'avance pour votre réponse.